Buat sebuah aplikasi dengan mudah tanpa pengalaman coding. Siapapun pasti bisa dari amatir sama profesional dan disini kami akan memberikan beberapa tutorial seputar Sketchware.
Panduan sketchware untuk pengguna baru
Dapatkan link
Facebook
X
Pinterest
Email
Aplikasi Lainnya
Congratulations on your first step towards becoming an Android app developer! Selamat atas langkah pertama Anda menjadi pengembang aplikasi Android!
Welcome to Sketchware, an Android app development platform on your Android smartphone! Selamat datang di Sketchware, platform pengembangan aplikasi Android di ponsel Android Anda!This guide will help you get started using Sketchware, as well as making the most out of it. Panduan ini akan membantu Anda mulai menggunakan Sketchware, serta memaksimalkannya.
Don't have Sketchware installed? Belum menginstal Sketchware?Click here ! Klik di sini !
If you are here from Sketchware and want to exit this guide at any point, simply press the back button to be redirected to Sketchware. Jika Anda berada di sini dari Sketchware dan ingin keluar dari panduan ini kapan saja, cukup tekan tombol kembali untuk dialihkan ke Sketchware.But, PLEASE read this guide ! Tapi, TOLONG baca panduan ini !I promise your 10 minutes of investment will help you create amazing mobile apps. Saya berjanji 10 menit investasi Anda akan membantu Anda membuat aplikasi seluler yang luar biasa.:-) :-)
This guide will cover two short topics: Panduan ini akan mencakup dua topik singkat:
1. Understanding the Features in Sketchware 1. Memahami Fitur di Sketchware
2. Starting and Sharing Your First Project 2. Memulai dan Membagi Proyek Pertama Anda
Step 1. Understanding the Features Langkah 1. Memahami Fitur
Sketchware will look like this when you first launch the application. Sketchware akan terlihat seperti ini ketika Anda pertama kali meluncurkan aplikasi.
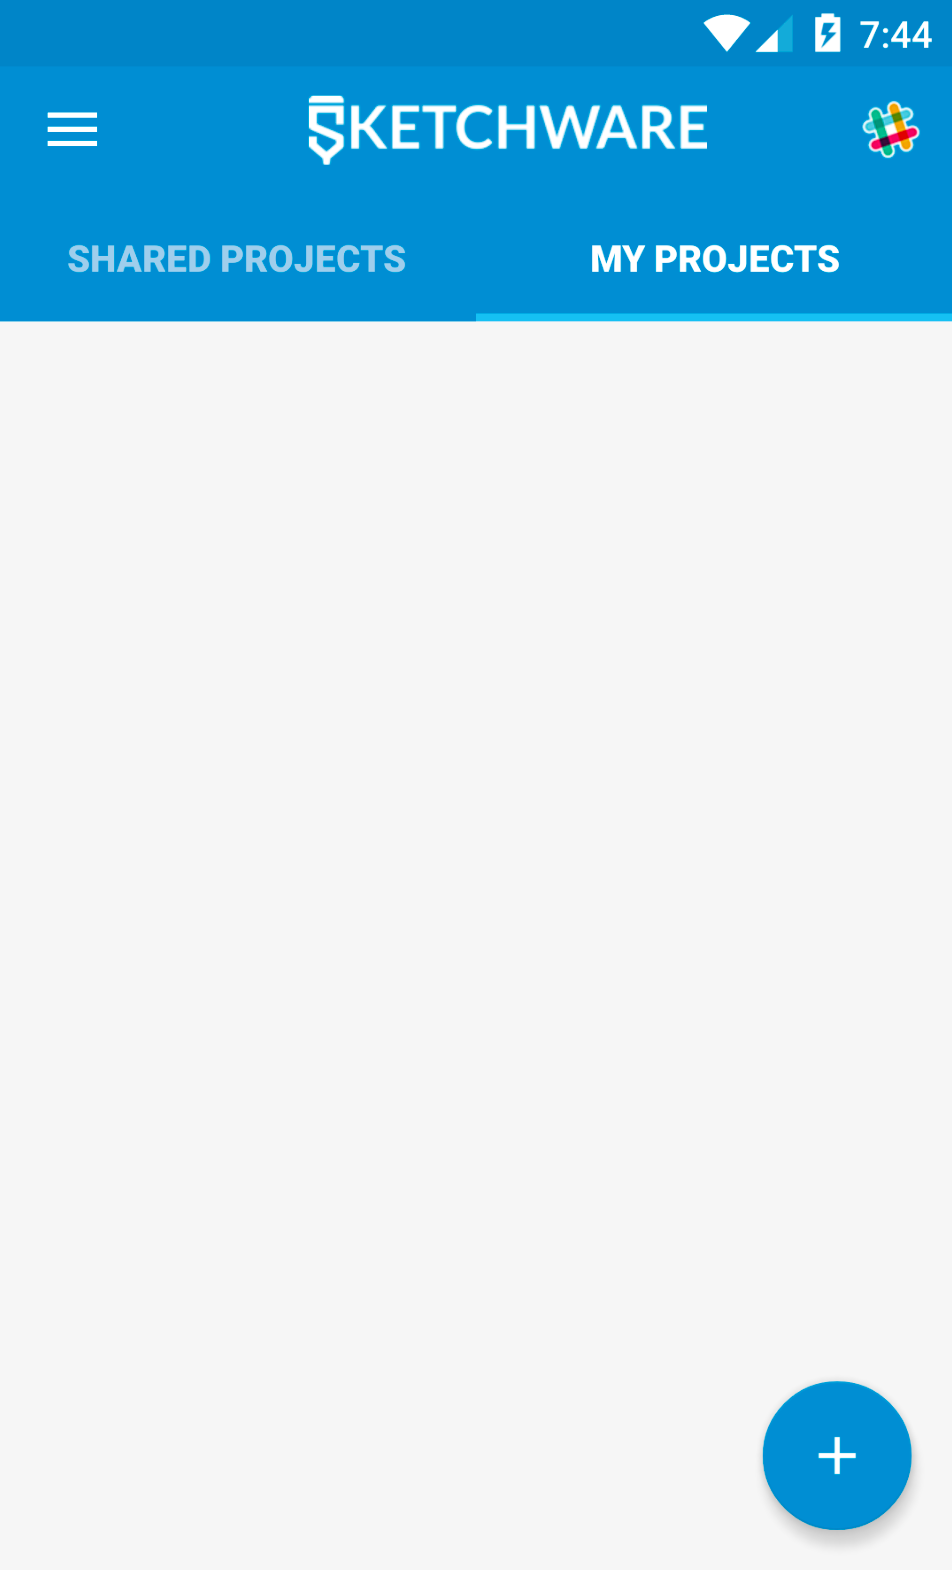
The first screen Sketchware greets you is Shared Projects. Layar pertama Sketchware menyapa Anda adalah Proyek Bersama.On here , you can find projects created by other fellow Sketchware users. Di sini , Anda dapat menemukan proyek yang dibuat oleh sesama pengguna Sketchware lainnya.Think of it as a Newsfeed for Sketchware Projects — you can like and comment on different projects and see what other people are creating. Anggap saja sebagai Umpan Berita untuk Proyek Sketchware - Anda dapat menyukai dan mengomentari berbagai proyek dan melihat apa yang dibuat orang lain.When you later create your own app, you can share yours here too! Saat nanti Anda membuat aplikasi sendiri, Anda juga dapat membagikannya di sini!
Step 2. Starting Your Project Langkah 2. Memulai Proyek Anda
In Sketchware, there are two ways to start your project. Di Sketchware, ada dua cara untuk memulai proyek Anda.
Sketchware Example Contoh Sketchware
Custom Project Proyek Kustom
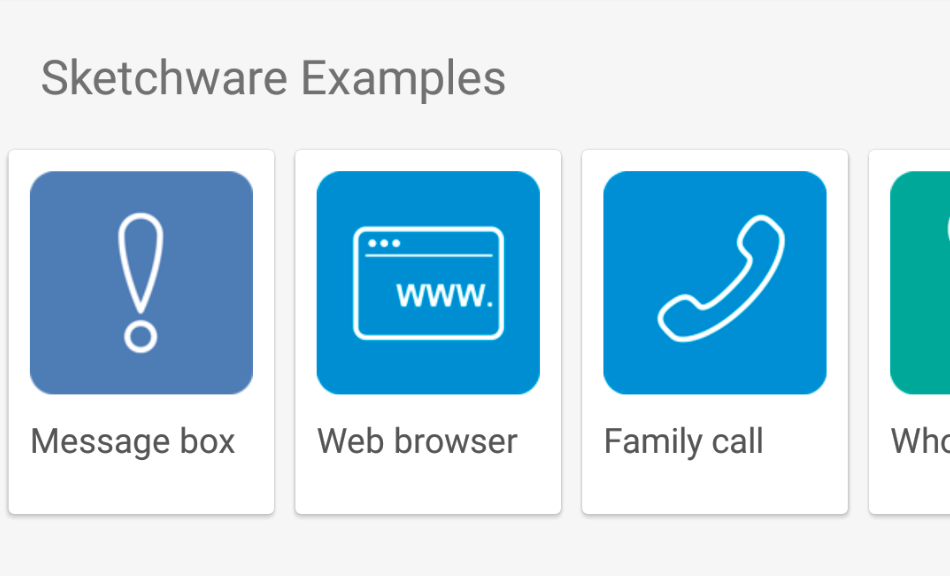
Sketchware Examples Contoh Sketchware
If you don't have any programming background, we recommend you to get started with Sketchware Examples . Jika Anda tidak memiliki latar belakang pemrograman, kami sarankan Anda untuk memulai dengan Contoh Sketchware .They are located under the Shared Projects tab, and these examples are provided to help you get the feel of how things work. Mereka berada di bawah tab Proyek Bersama, dan contoh-contoh ini disediakan untuk membantu Anda memahami cara kerja semuanya.
You'll learn a new programming concept by completing each example. Anda akan mempelajari konsep pemrograman baru dengan menyelesaikan setiap contoh.There are detailed tutorials for each example here . Ada tutorial terperinci untuk setiap contoh di sini .But don't click the link just yet! Tetapi jangan klik tautannya dulu!Finish reading this guide first. Selesaikan membaca panduan ini terlebih dahulu.
Custom Projects Proyek Khusus
Do you have prior experience in programming? Apakah Anda memiliki pengalaman sebelumnya dalam pemrograman?Great! Besar!You can try getting started right away, or you can try and get the hang of it by completing few Sketchware Examples f irst. Anda dapat mencoba memulai dengan segera, atau Anda dapat mencoba dan memahaminya dengan menyelesaikan beberapa Contoh Sketchware pada saat itu .It's your choice! Itu pilihanmu!
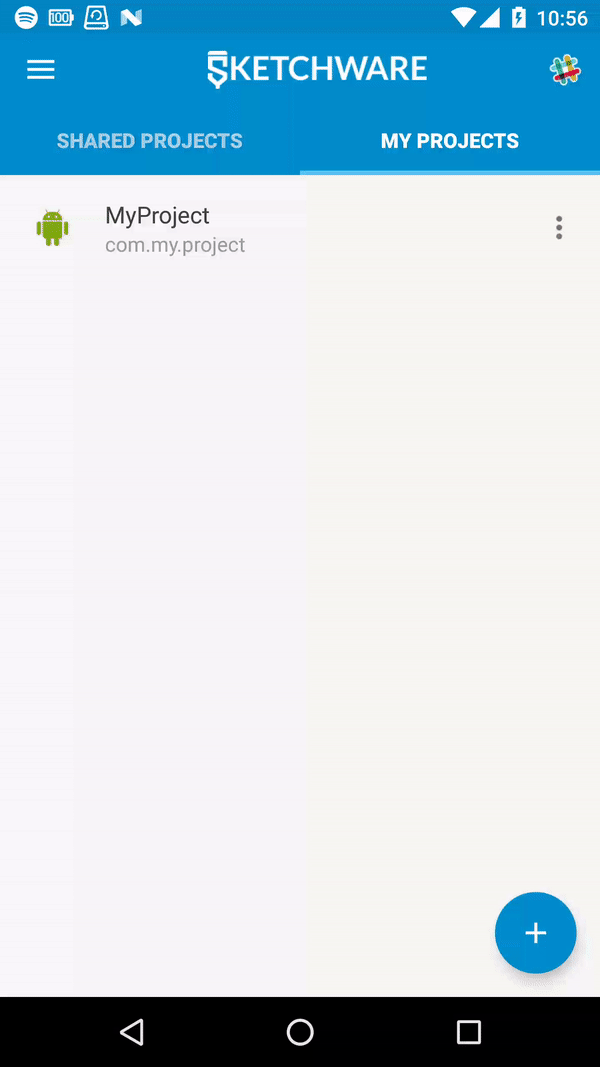
To get started on a custom project, navigate to My Projects tab. Untuk memulai proyek khusus, buka tab Proyek Saya .My Projects is where you can create your own applications.Proyek Saya adalah tempat Anda dapat membuat aplikasi Anda sendiri.
Click on the floating + button in the right bottom corner. Klik pada tombol + mengambang di sudut kanan bawah .
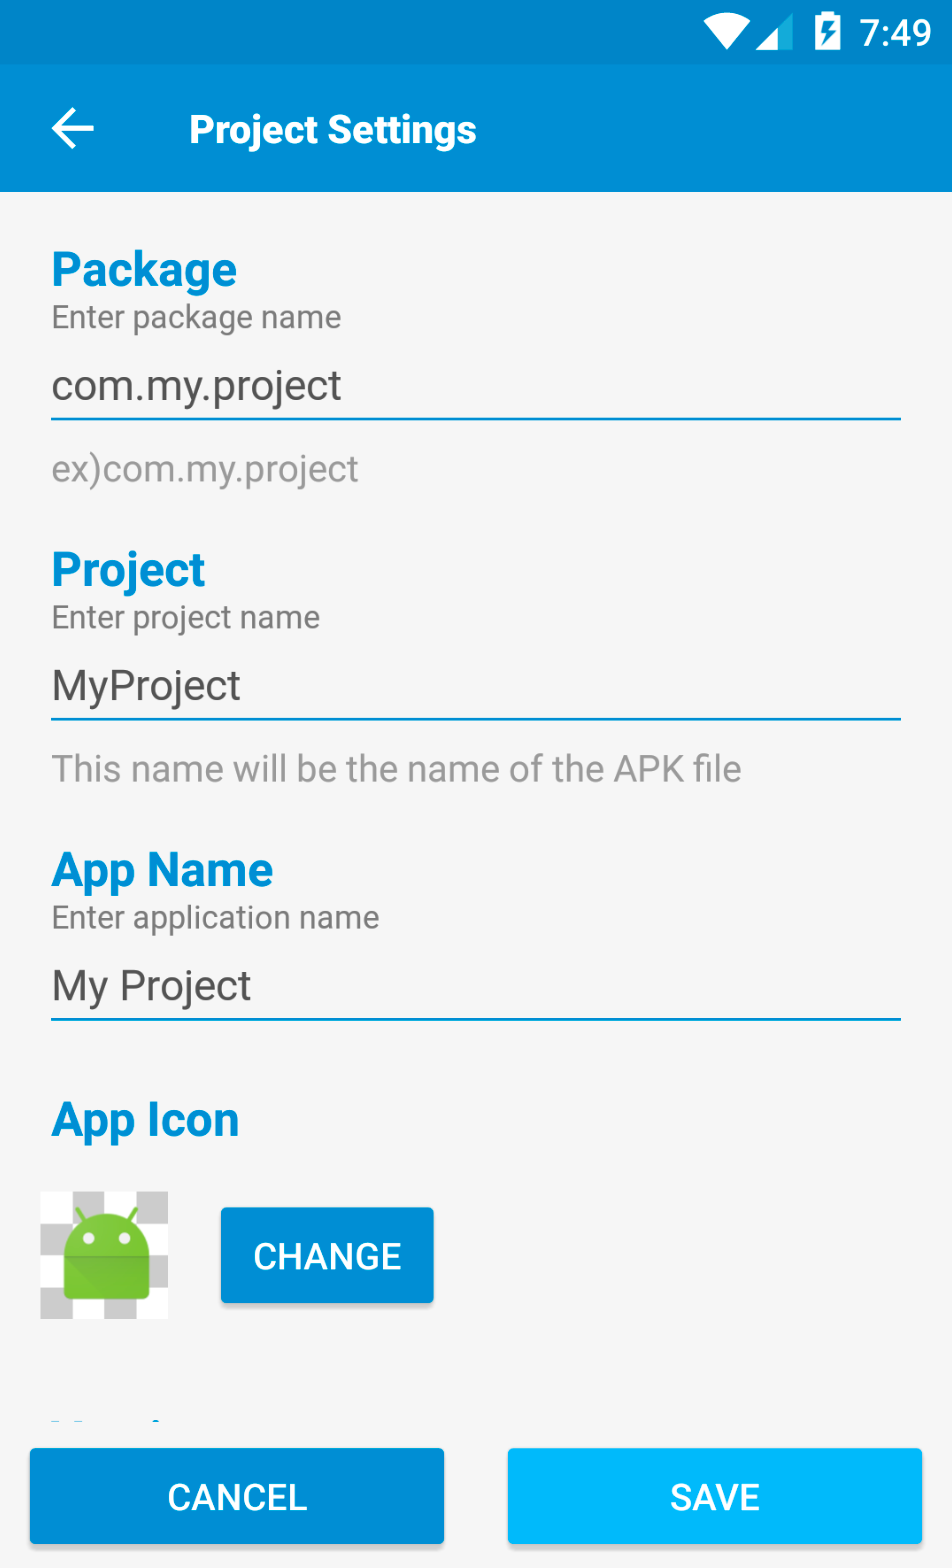
Here, you set the “identity” for your application. Di sini, Anda menetapkan "identitas" untuk aplikasi Anda.You might be confused about the “package name” section. Anda mungkin bingung tentang bagian "nama paket".Simply think of the package name as a fingerprint , or a unique name for your application . Cukup pikirkan nama paket sebagai sidik jari , atau nama unik untuk aplikasi Anda .
Package name is usually in a form of: Nama paket biasanya dalam bentuk: some.name.foryourapplicationsome.name.foryaplikasi
In this example, I'm going to use com.my.project . Dalam contoh ini, saya akan menggunakan com.my.project .Once you click save, you'll be redirected to the following screen. Setelah Anda klik simpan, Anda akan dialihkan ke layar berikut.
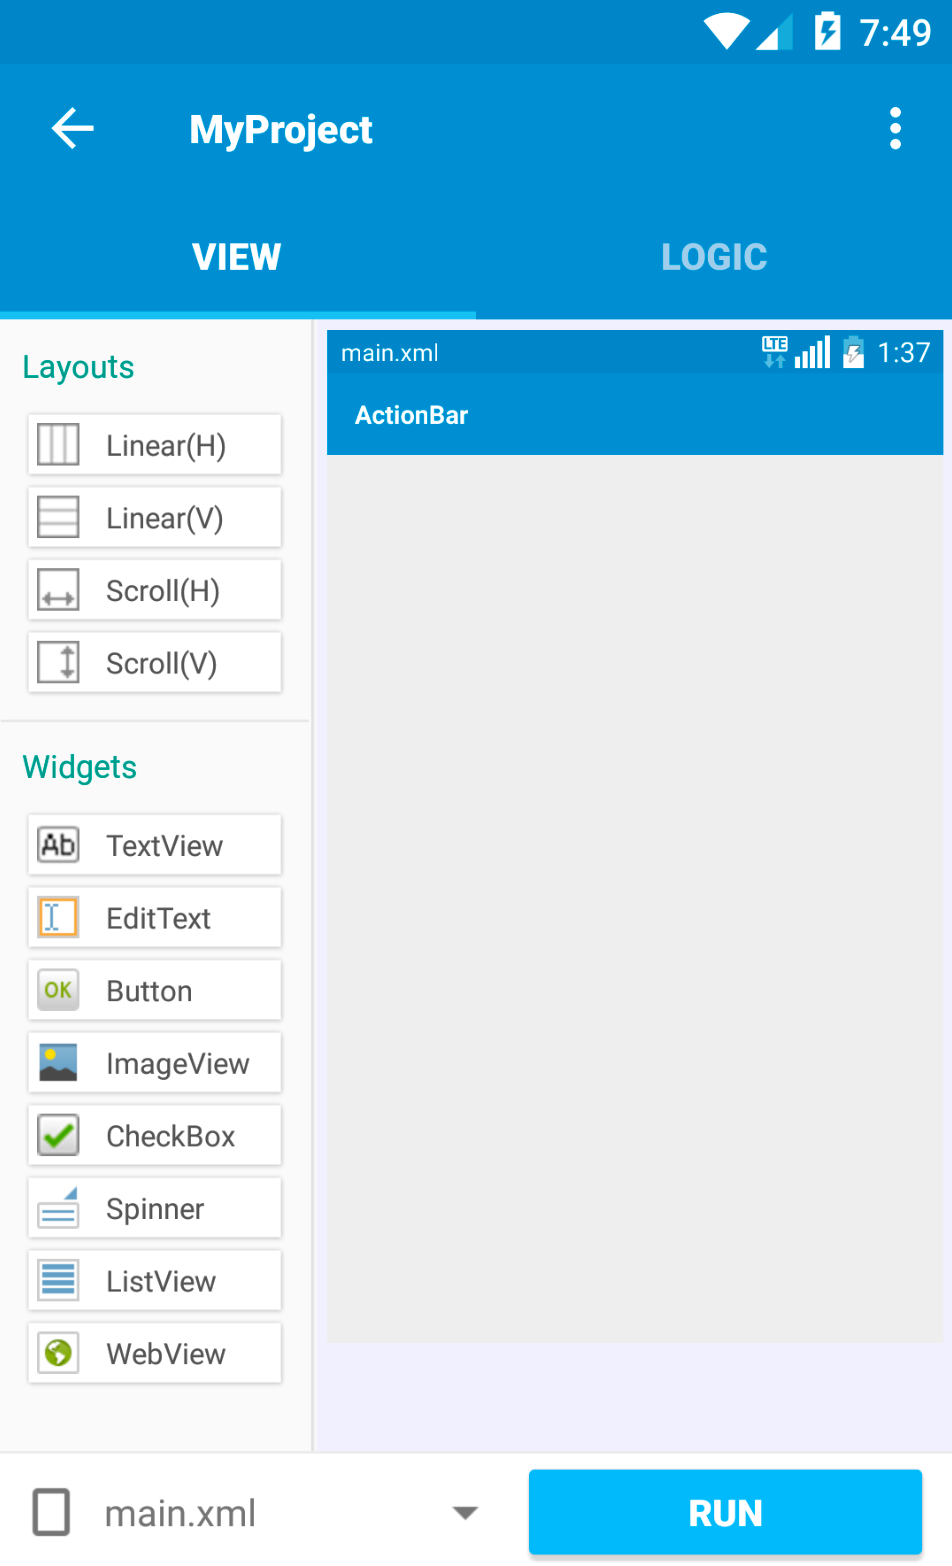
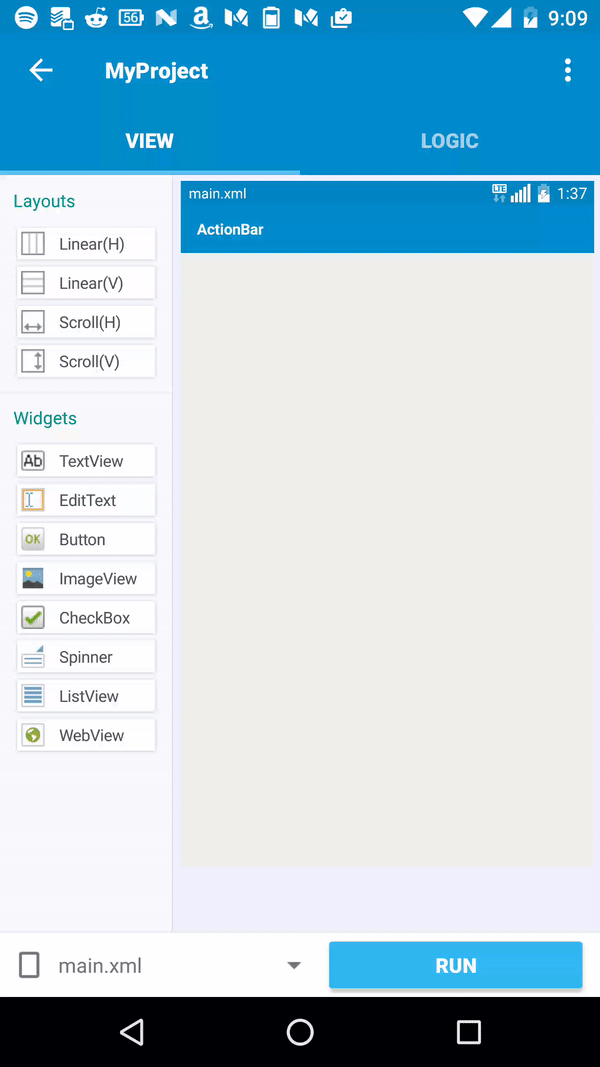
View Editor Lihat Editor
This is View Editor, where you design your application. Ini adalah Editor Tampilan, tempat Anda mendesain aplikasi Anda.On the left, you will find Layouts and Widgets . Di sebelah kiri, Anda akan menemukan Tata Letak dan Widget .
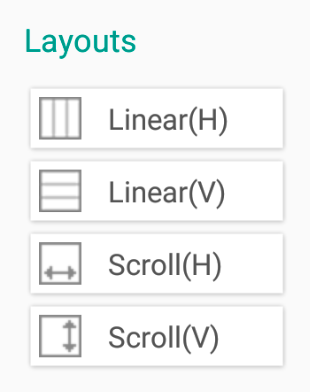
Layouts — container that can hold widgets in different orientationsTata letak - penampung yang dapat menyimpan widget dalam orientasi yang berbeda
Widgets — basic user interface components, such as Text or ButtonWidget - komponen antarmuka pengguna dasar, seperti Teks atau Tombol
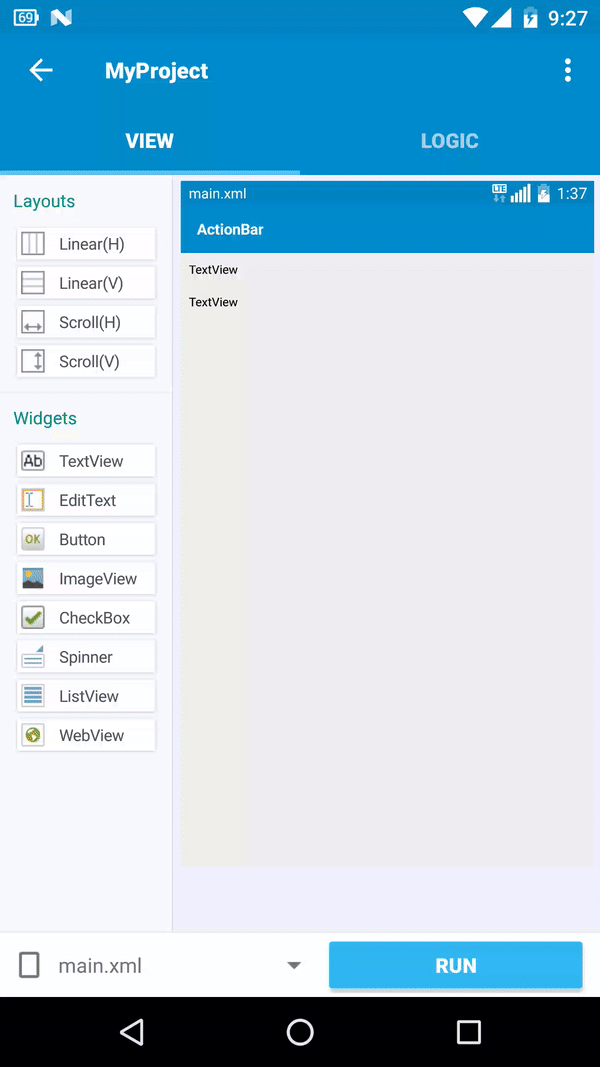
To place these, you have to long-click and drag them to the editor, like this: Untuk menempatkan ini, Anda harus mengeklik-panjang dan menyeretnya ke editor, seperti ini:
But as you start placing things inside the editor, you will feel like you can only place things vertically below each widget. Tetapi ketika Anda mulai menempatkan sesuatu di dalam editor, Anda akan merasa seperti Anda hanya dapat menempatkan sesuatu secara vertikal di bawah setiap widget.You might ask, “How do I place them next to each other?” This is where Layout comes in! Anda mungkin bertanya, “Bagaimana saya menempatkan mereka di samping satu sama lain?” Di sinilah Tata Letak masuk!
By using different layouts , you will be able to place things in different orientations! Dengan menggunakan tata letak yang berbeda, Anda akan dapat menempatkan hal-hal dalam orientasi yang berbeda!(H) stands for Horizontal, and (V) stands for Vertical. (H) adalah singkatan dari Horizontal, dan (V) adalah singkatan dari Vertical.
What if we wanted to change colors or font size of the TextView we just placed? Bagaimana jika kita ingin mengubah warna atau ukuran font dari TextView yang baru saja kita tempatkan?
Widgets have different properties , such as background color, width, height, visibility, etc. Widget memiliki properti yang berbeda, seperti warna latar belakang, lebar, tinggi, visibilitas, dll.
To do so, we need to edit its property . Untuk melakukannya, kita perlu mengedit propertinya .We can achieve that by simply clicking on the widget like this: Kita bisa mencapai itu hanya dengan mengklik widget seperti ini:
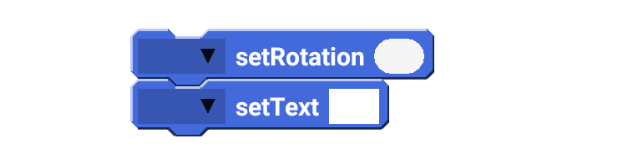
There are a lot of properties, and you might feel a bit overwhelmed at first. Ada banyak properti, dan Anda mungkin merasa sedikit kewalahan pada awalnya.But don't worry! Tapi jangan khawatir!Sketchware has a built-in Widget Helper that can help you get started! Sketchware memiliki built-in Widget Helper yang dapat membantu Anda memulai!First, let's open the Widget Helper . Pertama, mari kita buka Widget Helper .
On the helper, you can play around with different properties on various widgets. Pada helper, Anda dapat bermain-main dengan berbagai properti di berbagai widget.Here, I played around with the rotate property on the Button Widget . Di sini, saya bermain-main dengan properti rotate pada Widget Tombol .By playing around with different Widgets in the Widget Helper , you will master the concept of property in no time! Dengan bermain-main dengan Widget berbeda di Widget Helper , Anda akan menguasai konsep properti dalam waktu singkat!Once you feel comfortable, try designing your own application. Setelah Anda merasa nyaman, coba rancang aplikasi Anda sendiri.
Next, let's talk about how we can program our application to function. Selanjutnya, mari kita bicara tentang bagaimana kita dapat memprogram aplikasi kita berfungsi.
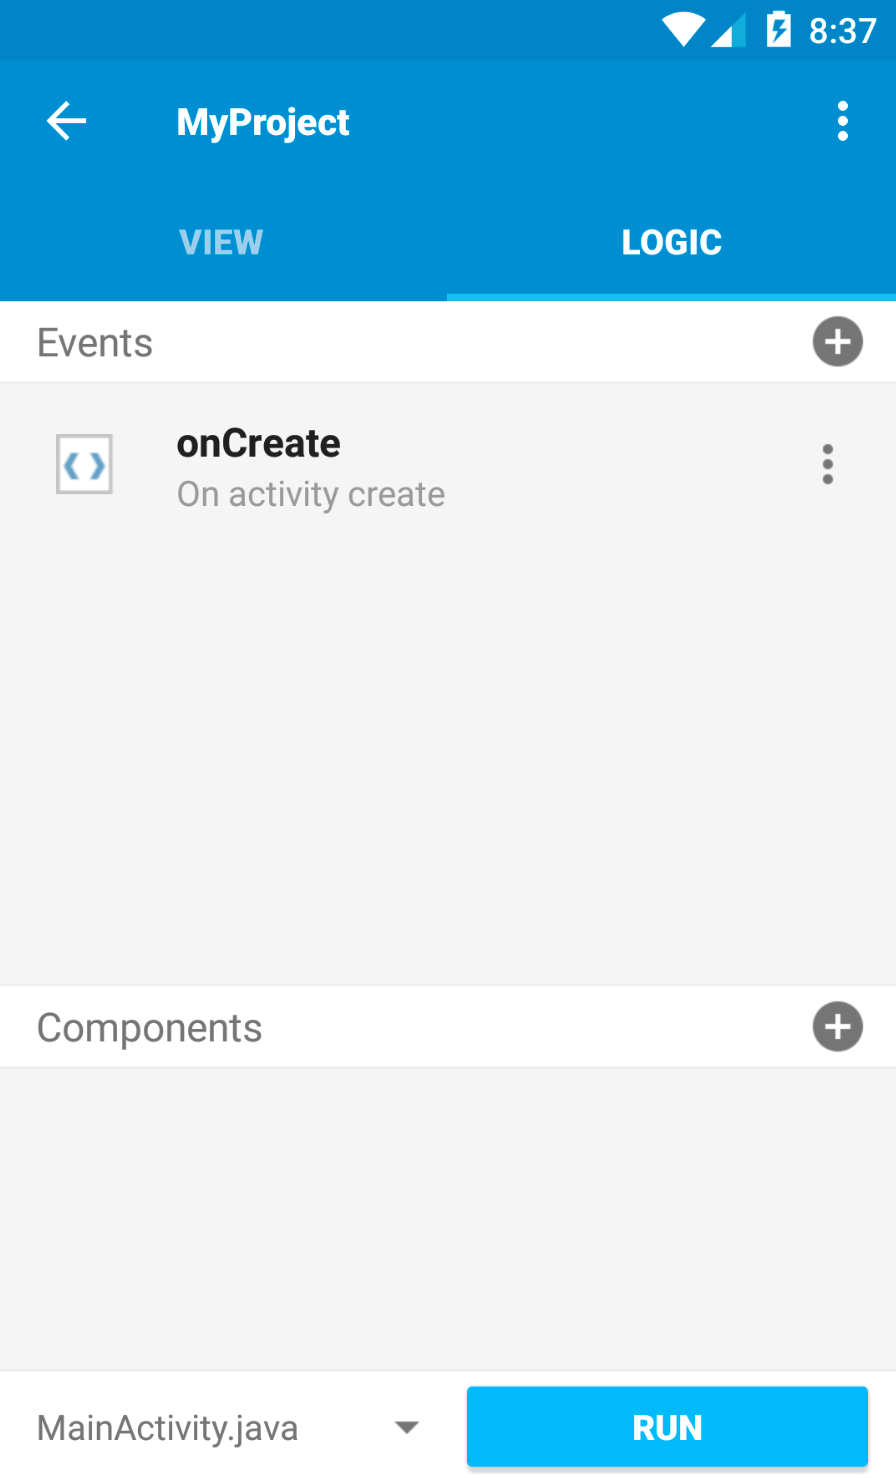
Logic Editor Editor Logika
Logic Editor is where you program how your application behaves. Logic Editor adalah tempat Anda memprogram bagaimana aplikasi Anda berperilaku.For example, you can program what clicking on a Button will do. Misalnya, Anda dapat memprogram apa yang diklik pada Tombol akan dilakukan.
Events and Components Acara dan Komponen
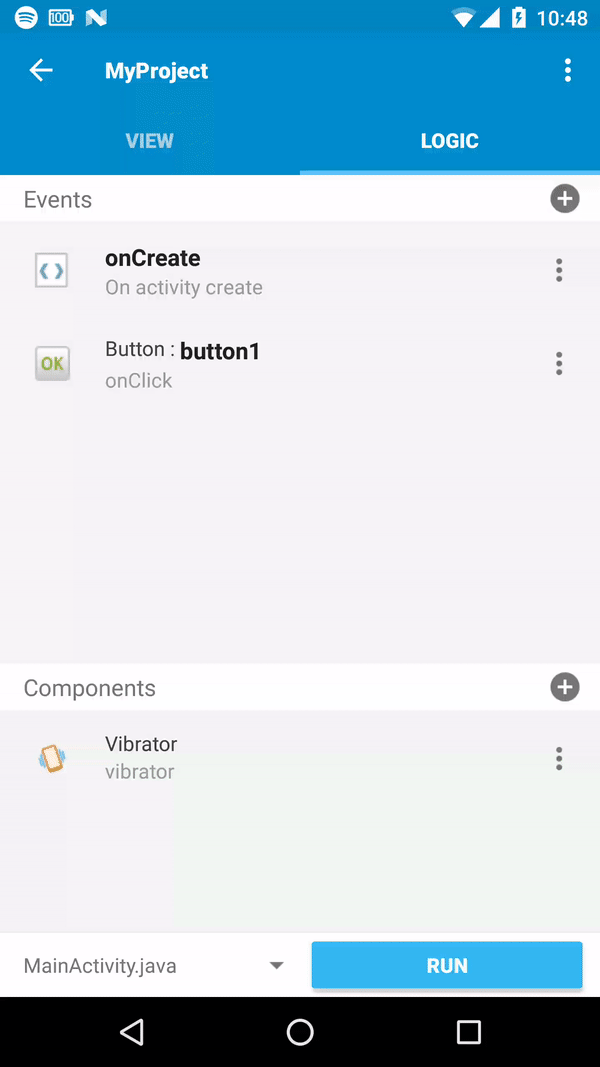
Logic Editor is comprised of two main functions: Logic Editor terdiri dari dua fungsi utama:
Events — Event is user-action.Acara - Acara adalah aksi pengguna.It could be something like clicking on a Button or checking a CheckBox . Ini bisa berupa sesuatu seperti mengklik Tombol atau memeriksa Kotak Centang .
Components — Think of Components as Widgets working in the background.Komponen - Pikirkan Komponen sebagai Widget yang bekerja di latar belakang.They handle work such as playing sound or making the phone vibrate . Mereka menangani pekerjaan seperti memainkan suara atau membuat ponsel bergetar .
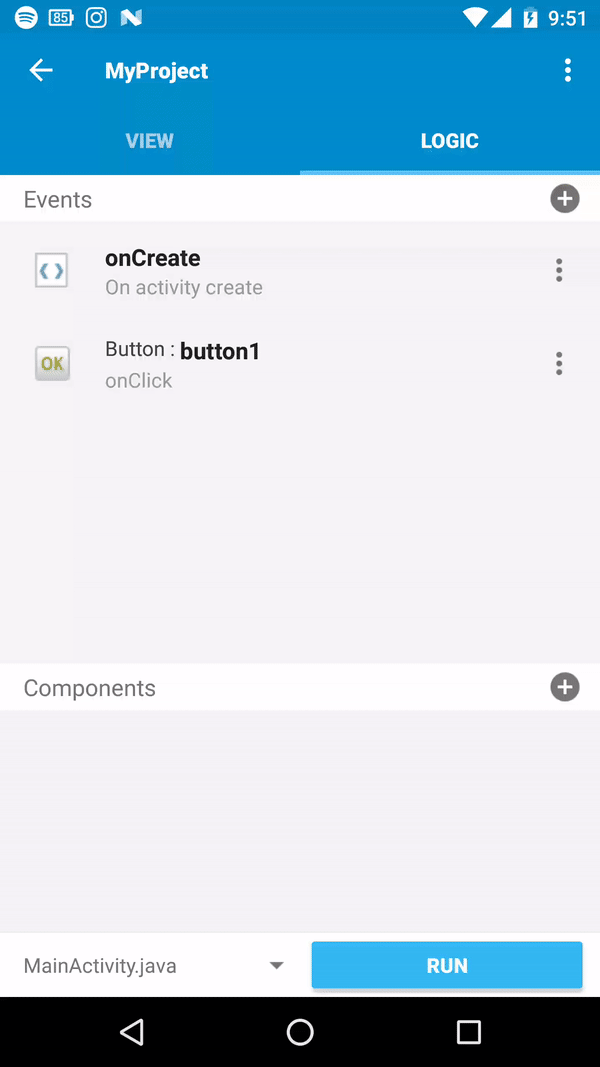
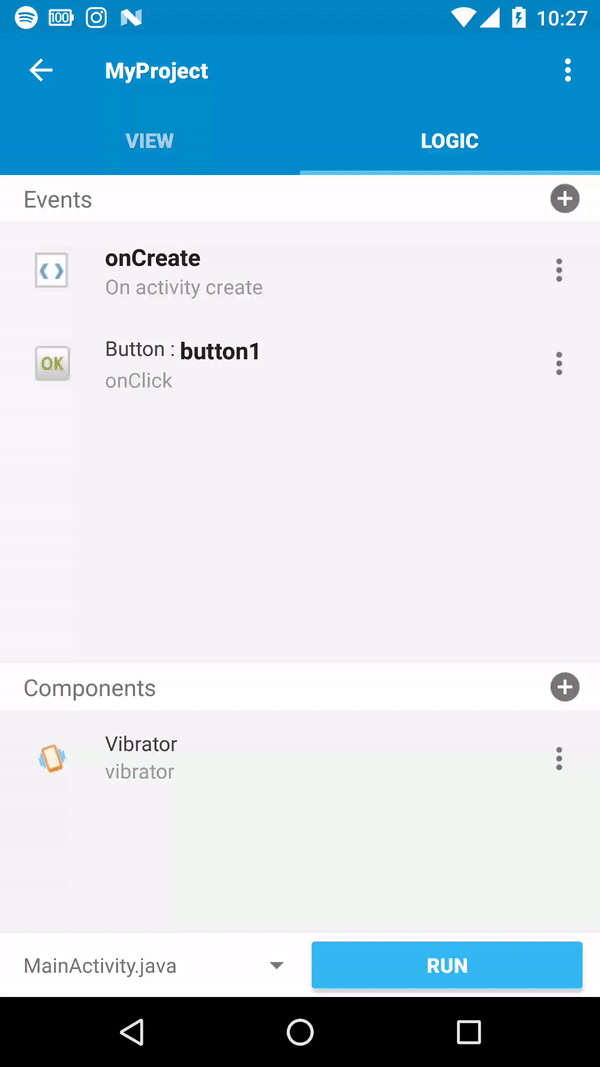
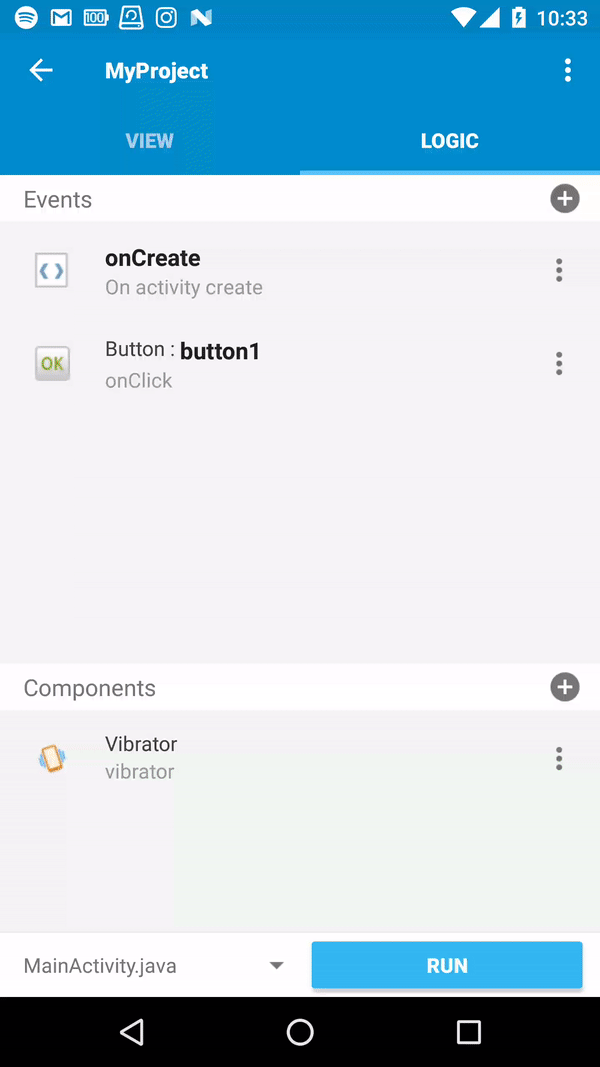
Note that in the image above, there is a default event provided named onCreate . Perhatikan bahwa pada gambar di atas, ada acara default yang disediakan bernama onCreate .Whatever you program in this default event will get fired when the application starts. Apa pun yang Anda program di acara default ini akan dipecat ketika aplikasi dimulai.There are, however, more events available than just onCreate event. Namun, ada lebih banyak acara yang tersedia daripada hanya di acara onCreate .
Whenever we add a widget that can perform an action, such as a Button , a new event gets added in the events tab. Setiap kali kita menambahkan widget yang dapat melakukan tindakan, seperti Tombol , acara baru ditambahkan di tab acara.Later on, I'll explain how you can edit how these events behave. Nanti, saya akan menjelaskan bagaimana Anda dapat mengedit bagaimana perilaku ini berperilaku.Check it out below. Lihat di bawah ini.I added a button in the View Editor, and onClick event was added in the Logic Editor. Saya menambahkan tombol di Editor Tampilan, dan acara onClick ditambahkan di Editor Logika.
On the other hand, you have to manually add Components in order to use them, just like Widgets . Di sisi lain, Anda harus menambahkan Komponen secara manual agar dapat menggunakannya, seperti Widget .Don't worry about these for now. Jangan khawatir tentang ini sekarang.
By combining events and components , it will help you create very powerful applications. Dengan menggabungkan acara dan komponen , itu akan membantu Anda membuat aplikasi yang sangat kuat.Next, let's talk about how we can change how we can program each event to behave. Selanjutnya, mari kita bicara tentang bagaimana kita dapat mengubah cara kita memprogram setiap peristiwa untuk berperilaku.
Blocks Blok
In Sketchware, you program everything in Blocks . Di Sketchware, Anda memprogram semuanya di Blok .They were inspired by MIT's Scratch block language. Mereka terinspirasi oleh bahasa blok Scratch MIT.What do they look like? Mereka terlihat seperti apa?Here, take a look. Di sini, lihatlah.
The names of blocks are very straight forward right? Nama-nama balok sangat lurus ke depan bukan?You can probably guess what each block does by looking at its name. Anda mungkin bisa menebak apa yang setiap blok lakukan dengan melihat namanya.
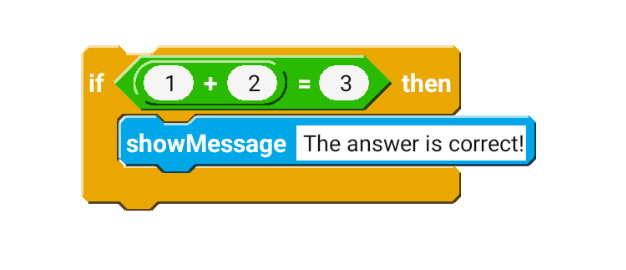
Like Lego, you can connect these blocks. Seperti Lego, Anda dapat menghubungkan blok-blok ini.By connecting them together, you can perform specific actions. Dengan menghubungkannya bersama, Anda dapat melakukan tindakan tertentu.For example, if I wanted to say “1 + 2 = 3 is correct” in blocks, it would look like this: Sebagai contoh, jika saya ingin mengatakan "1 + 2 = 3 benar" dalam blok, akan terlihat seperti ini:
Differently Shaped Blocks Blok Berbentuk Berbeda
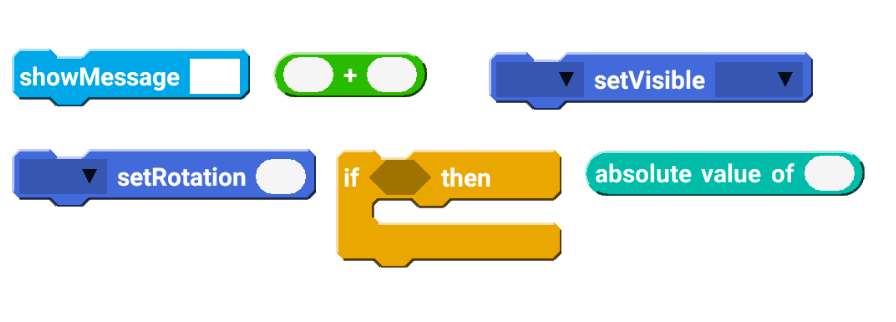
More importantly, take a look at how holes in blocks have different shapes: Lebih penting lagi, lihatlah bagaimana lubang di blok memiliki bentuk yang berbeda:
These blocks take in different types of input. Blok-blok ini mengambil berbagai jenis input.
Rectangle — It can only take in String (series of characters, such as abc123 ) value.Rectangle - Hanya dapat mengambil nilai String (seri karakter, seperti abc123 ).
Oval — It can only take in Number value, such as 1 or 12312. Does not accept String values.Oval - Hanya dapat mengambil nilai Angka , seperti 1 atau 12312. Tidak menerima nilai String.
Hexagon — can only take in true or false value.Hexagon - hanya dapat mengambil nilai benar atau salah .
Command Blocks and Input Blocks Blok Komando dan Blok Masukan
Also, note that there are different shaped blocks for different purposes. Juga, perhatikan bahwa ada blok berbentuk berbeda untuk tujuan yang berbeda.
Blocks that can connect to each other like puzzle pieces are called command blocks . Blok yang dapat terhubung satu sama lain seperti potongan puzzle disebut blok perintah .They perform a certain action, such as rotating a widget or changing the text of a widget. Mereka melakukan tindakan tertentu, seperti memutar widget atau mengubah teks widget.
Other blocks that do not connect, are usually used as an input to the command blocks. Blok lain yang tidak terhubung, biasanya digunakan sebagai masukan ke blok perintah.
You can connect these blocks as long as they fit! Anda dapat menghubungkan blok-blok ini selama cocok!Pretty simple, right? Sangat sederhana, bukan?You really don't need prior programming experience to get the hang of these blocks; Anda benar-benar tidak membutuhkan pengalaman pemrograman sebelumnya untuk memahami blok-blok ini;however, there are a lot of blocks, so you might question what each block does. Namun, ada banyak blok, jadi Anda mungkin mempertanyakan apa yang setiap blok lakukan.
Just like Widget Helper , there is Block Helper that helps you get started on understanding the Blocks. Sama seperti Widget Helper , ada Block Helper yang membantu Anda memulai memahami Blok.
Feel comfortable with Blocks now? Merasa nyaman dengan Blok sekarang?Let's now try connecting these blocks on to the Events we previously talked about. Mari sekarang coba hubungkan blok-blok ini ke Acara yang sebelumnya kita bicarakan.
Editing Events Mengedit Acara
By combining our knowledge on Blocks and Events , we can now program! Dengan menggabungkan pengetahuan kami tentang Blok dan Acara , sekarang kami dapat memprogram!
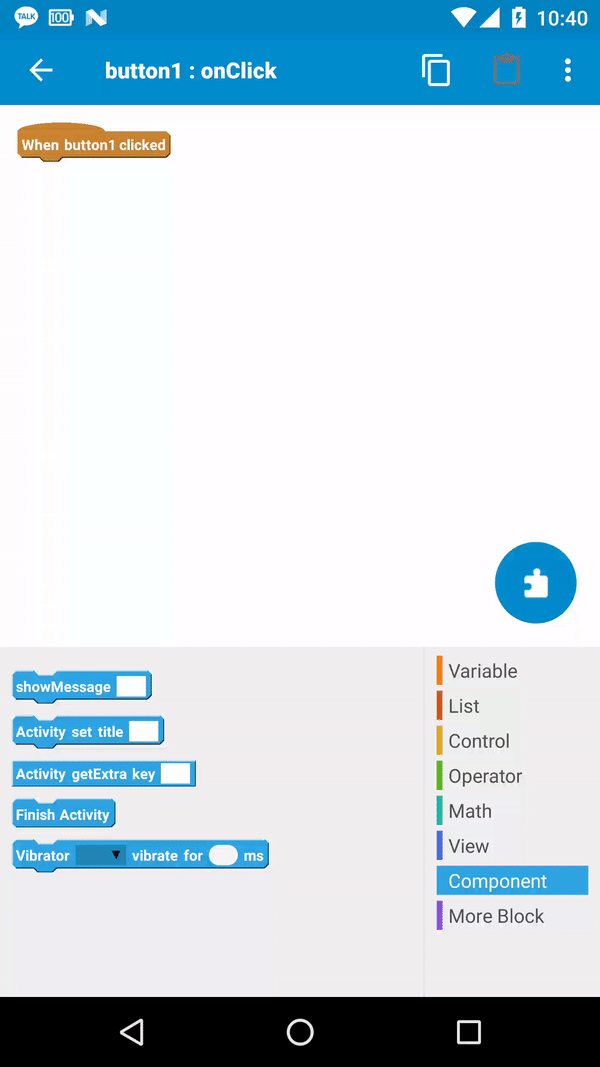
As our first application, we'll create an application that shows the message “Hello World!” when a button is clicked: Sebagai aplikasi pertama kami, kami akan membuat aplikasi yang menunjukkan pesan "Hello World!" Saat tombol diklik:
First, Let's open the event we created earlier for the Button. Pertama, Mari kita buka acara yang kami buat sebelumnya untuk Button.Here, when we click on the floating button, we can see all the blocks we can use for the event: Di sini, ketika kita mengklik tombol mengambang, kita dapat melihat semua blok yang dapat kita gunakan untuk acara:
For this application, we really only need the showMessage Block. Untuk aplikasi ini, kami benar-benar hanya membutuhkan Block showMessage .This block is one of the default blocks located under Components tab. Blok ini adalah salah satu blok default yang terletak di bawah tab Komponen .
This is on the side note, but note that whenever we add Components , we gain access to new Blocks under the Components tab in the Logic Editor. Ini ada di catatan samping, tetapi perhatikan bahwa setiap kali kita menambahkan Komponen , kita mendapatkan akses ke Blok baru di bawah tab Komponen di Editor Logika.
Let's connect the showMessage block to the onClick event block: Mari sambungkan blok showMessage ke blok kejadian onClick:
Neat! Rapi!Time to add “Hello World!” into the block: Saatnya menambahkan "Hello World!" Ke dalam blok:
Nice. Bagus.Time to install this bad boy on our phones! Saatnya memasang anak nakal ini di telepon kami!😎 😎
Installing on Our Smartphone Memasang di Ponsel Cerdas Kami
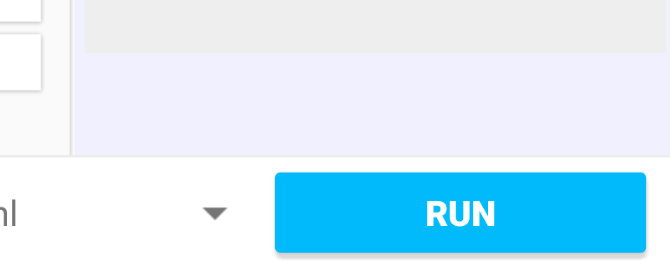
Navigate back to the View or Logic Editor. Arahkan kembali ke View atau Logic Editor.You'll see a big fat RUN button located in the right bottom corner. Anda akan melihat tombol RUN gemuk besar yang terletak di sudut kanan bawah.By clicking on this button, the project we just finished will turn into an installable APK file. Dengan mengklik tombol ini, proyek yang baru saja kita selesaikan akan berubah menjadi file APK yang dapat diinstal.
Click it and see the magic happen ✨ Klik dan lihat keajaiban terjadi ✨
Ladies and Gentlemen, here it is. Hadirin sekalian, ini dia.our very first Android Application in 5 minutes ! Aplikasi Android pertama kami dalam 5 menit !
Sharing and Exporting Project Proyek Berbagi dan Mengekspor
We created our first project. Kami menciptakan proyek pertama kami.How do we share this amazing project with the world? Bagaimana kita membagi proyek luar biasa ini dengan dunia?
There are two ways to do it: Ada dua cara untuk melakukannya:
Share it with other Sketchware users Bagikan dengan pengguna Sketchware lainnya
Export the APK file via email to share or upload on Google Play Store Ekspor file APK melalui email untuk dibagikan atau diunggah di Google Play Store
Sharing on Sketchware Berbagi di Sketchware
Go back to My Projects tab and click on the three dots next to your project. Kembali ke tab Proyek Saya dan klik pada tiga titik di samping proyek Anda.Here you can attach screenshots and add Title and Description for your application: Di sini Anda dapat melampirkan tangkapan layar dan menambahkan Judul dan Deskripsi untuk aplikasi Anda:
After you click the Share button, you will be able to find it under Shared Projects tab. Setelah Anda mengklik tombol Share , Anda akan dapat menemukannya di bawah tab Bersama Proyek .
Sharing outside of Sketchware Berbagi di luar Sketchware
You can export the APK file that you can share with other people such as friends and relatives, or upload it to the Google Play Store. Anda dapat mengekspor file APK yang dapat Anda bagikan dengan orang lain seperti teman dan kerabat, atau mengunggahnya ke Google Play Store.However, note that in order to upload to the Play Store, you will need a Developer Account for the Play Store. Namun, perhatikan bahwa untuk mengunggah ke Play Store, Anda akan memerlukan Akun Pengembang untuk Play Store.
First, create the needed Certificate, and you will be able to export the APK file after. Pertama, buat Sertifikat yang diperlukan, dan Anda akan dapat mengekspor file APK setelahnya.Don't forget the password! Jangan lupa kata sandinya!
Let's Get Started! Mari Kita Mulai!
If you want to get started on your first application, simply press the back button to return to Sketchware!Jika Anda ingin memulai aplikasi pertama Anda, cukup tekan tombol kembali untuk kembali ke Sketchware!
I wish you the best luck. Semoga Anda beruntung.Happy coding! Selamat coding!😎 😎


Apakah support admob?.dari mana kita dapat penghasilan?
BalasHapusSepertinya sudah support admob
BalasHapusKomentar ini telah dihapus oleh pengarang.
BalasHapusKomentar ini telah dihapus oleh pengarang.
BalasHapusUntuk tutorial tentang sketchware kamu bisa lihat juga di siniCara membuat aplikasi chat dengan sketchware
BalasHapusBang, bisa bantu, knp pas jalan aplikasinya, kok error, invalid list operator index 6 size 6. Mohon pencerahaannya
BalasHapusKa cara buka widget sma block helper dimana,, saya pake sketchware di tombol tiga d kanan atas
BalasHapuskok gak sama
Masuk sini gan untuk tutorial lainnya SKETCHWARE tutorial Indonesia
BalasHapusDi sketchware, berbayar gak untuk penggunaan ny
BalasHapustolong tampilanya di perbaiki lagi gan
BalasHapus